Target mappings

Mappings in PowerShell v2 target systems connect fields in your persons to fields in target user accounts, such as the sAMAccountName, userPrincipalName, and cn. Target mappings are applied during enforcement.
To get started, Map fields.
The main differences in mappings in PowerShell v1 systems vs. PowerShell v2 systems are:
A graphical interface, instead of PowerShell scripting
Ability to map the same field differently per account lifecycle stage. For example, if you want to enter a department name as the account description in most cases, but "Disabled by HelloID" when it's disabled.
# | Name | Description |
|---|---|---|
1 | Search Fields | Filter the grid based on mapping Names. |
2 |
| Filter the grid based on account lifecycle stage and/or status of Use In Notifications and Store In Account Data toggles. |
3 |
| Refresh the grid. |
4 | Import previous saved mapping | |
5 | Export mapping | Export mapping to import it at another target system like Active Directory or PowershellV2 for ease of setup. |
6 | Delete all | Delete all mapped fields (WARNING: use with extreme caution). After deleting all fields, click Default Fields to restore default mappings. |
7 | Add Field | Add a new mapped field. |
8 | Preview | Update the Preview Value column, using the currently selected person and lifecycle stage. (Before previewing, you must select a person in |
9 |
| Select a person and lifecycle stage to preview mappings for (after selecting these, click the Preview button). |
10 | Name column | The name of the mapped field. |
11 | Configured Actions column | The lifecycle stages that the mapping is active for: |
12 | Options column |
|
13 | Preview Value column | The current value of the mapped field. |
14 |
| Edit the mapped field (see "Individual mappings", below). |
15 | Number of fields | The total number of mapped fields. |


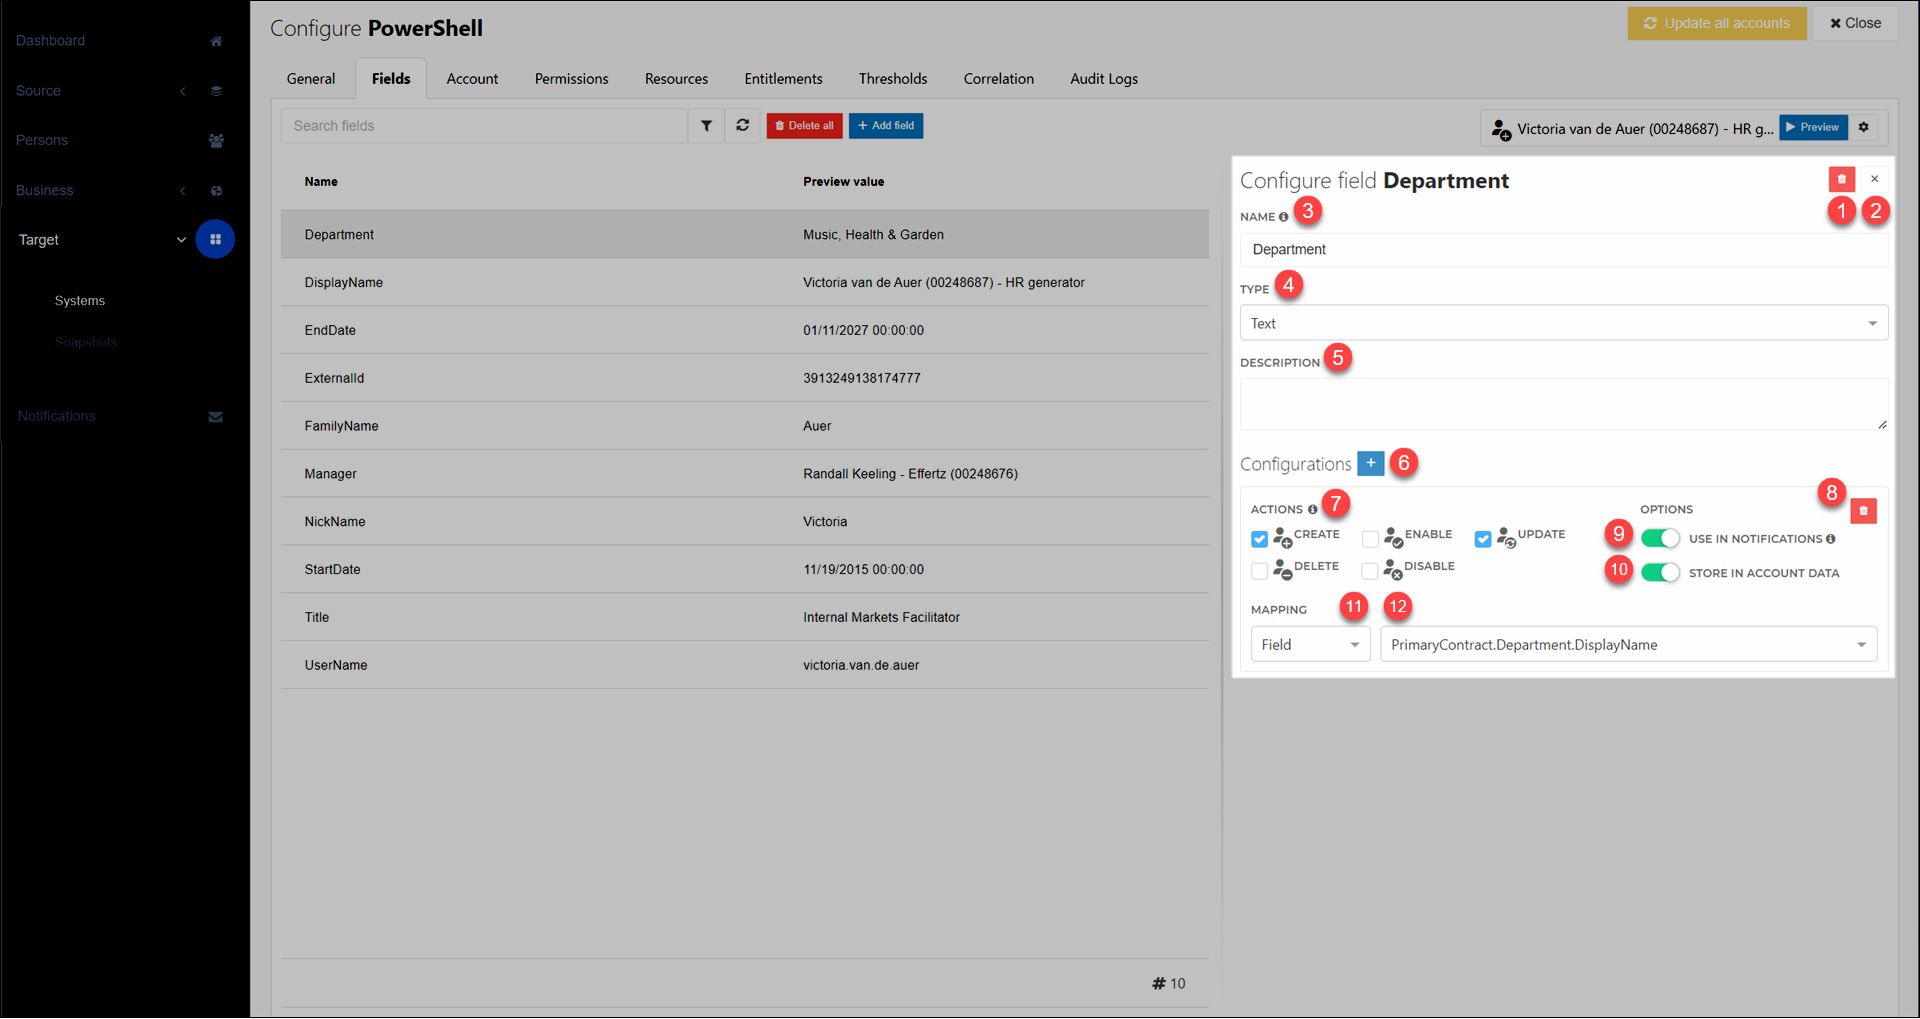
# | Name | Description |
|---|---|---|
1 |
| Delete this mapped field. |
2 |
| Stop editing this mapped field and return to the grid. Any changes you made are automatically saved. |
3 | Name | The name of this mapped field. |
4 | Type | The type of this mapped field:
|
5 | Description | An optional description of this mapped field, for internal (admin) reference only. |
6 |
| Add a new configuration to this mapped field. Configurations let you vary a field's mapping depending on the account lifecycle stage (using the Actions checkboxes). |
7 | Actions | Specify which account lifecycle stage(s) the current configuration should be active for. Each stage can only be used in a single configuration. |
8 |
| Delete this configuration. |
9 | Use In Notifications | Make this mapped field available to use as a condition in Notifications (including conditional notifications). |
10 | Store In Account Data | See Share account fields between target systems. (Replaces |
11 | Mapping type |
|
12 | Person field | The field from the Person schema that will be used as the basis for this mapped field. |


Field types
Each mapped field must be one of the following Types:
Text (string)
Array (array of strings) — only compatible with Complex target mappings). The maximum size of an array is approximately 25,000 characters total. Array-type fields are not currently supported in conditional notifications. Array-type fields become
ArrayLists in PowerShell, which means you can't use theAddmethod. Instead, use the+=operator to add items to an array. For example:$outputContext.Data.ProxyAddresses += "test".
Field names cannot begin with a number. All field names are case-insensitive. Any non-string data assigned to a field will be converted into a string. There is no limit to the number of fields you can create.
Note
You can make any field a property of an object instead of a standalone string or array, by using a dot in its Name (.). For example, Department.Code. Then, in your PowerShell scripts, Code will be a property of a PSObject named Department.
Limitations include:
An object cannot have the same name as a standalone field
Nested objects are not supported
Arrays of objects are not supported