PowerSchool SAML application setup
Introduction
This manual shows you how to setup SSO to PowerSchool using the SAML protocol. The configuration takes place in HelloID and in the PowerSchool admin console. You may find additional information directly on the PowerSchool support website.
Requirements:
HelloID environment
PowerSchool environment
Create or Import a Certificate
If there is no certificate yet, a certificate must be imported or created. This can be done in the HelloID Administrator Portal under Settings > Certificates. For this guide, we will use a self-signed certificate. Learn more about certificates here.
Export the Certificate
In order for PowerSchool to accept communications from HelloID, it must have a copy of the certificate that HelloID uses to sign its SAML assertions. For this, you'll need to export a copy of the certificate that you created as a password-protected PFX file.
In the HelloID Admin Dashboard, navigate to Settings > Certificates.
Find the certificate that you just created or uploaded for PowerSchool, and click its Details link.
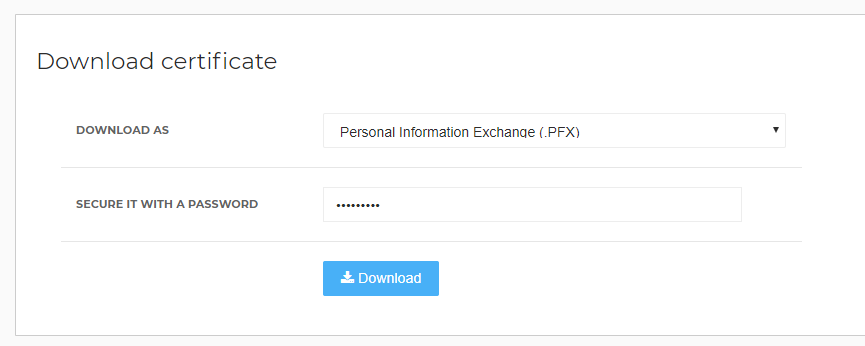
In the Download certificate section, choose to download a PFX file and provide a password of your choice. Make note of the password for later use.
Click Download and save the file. Make note of the file location for use later on in this guide.
Add the PowerSchool Application
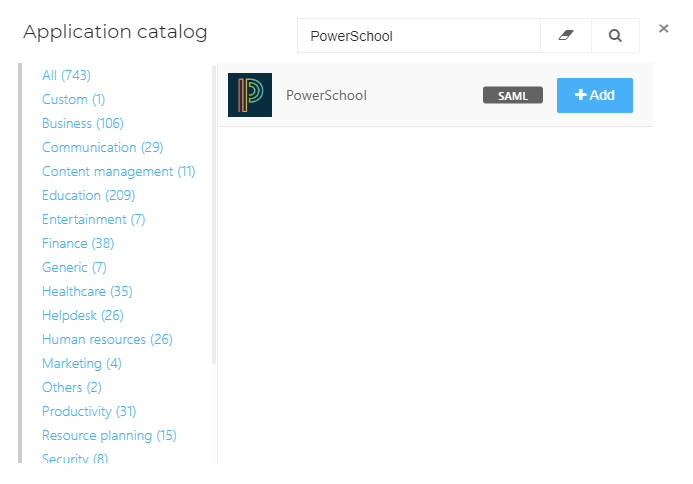
Create a new application in HelloID by navigating to Applications > Applications. Open the Application Catalog and search for "PowerSchool". Find the SAML template, and click Add. Learn more about managing applications here.
General Tab
On the General tab, replace {customer url} with your organization's PowerSchool URL. Additionally, update the display name of the application to indicate the type of user who will be accessing it, such as Admins, Teachers, Students, or Guardians.
Optionally, you may also add a description. Click Next when you are finished.
Single Sign On Tab
On the Single Sign On tab, update the following fields and click Next when finished.
Issuer: Update this to reflect your organization's HelloID instance URL.
Endpoint/ACS URL: Replace {customer url} with your PowerSchool URL.
X509 Certificate: Select the self-signed certificate you created earlier.
Extra audience: Replace {customer url} with your PowerSchool URL.
Self service tab
On the Self Service tab, choose whether to automatically create a Self Service product, which makes the application requestable. This is optional. Click Next.
Finish tab
On the Finish tab, click Save to add the application to HelloID.
Application Metadata & Additional Configuration
After saving the PowerSchool application, click on its Edit link on the applications overview. This will bring you to its properties page.
On the application's General tab, right click on Download metadata and select Copy link address. Make note of the copied URL, as you will need it later.
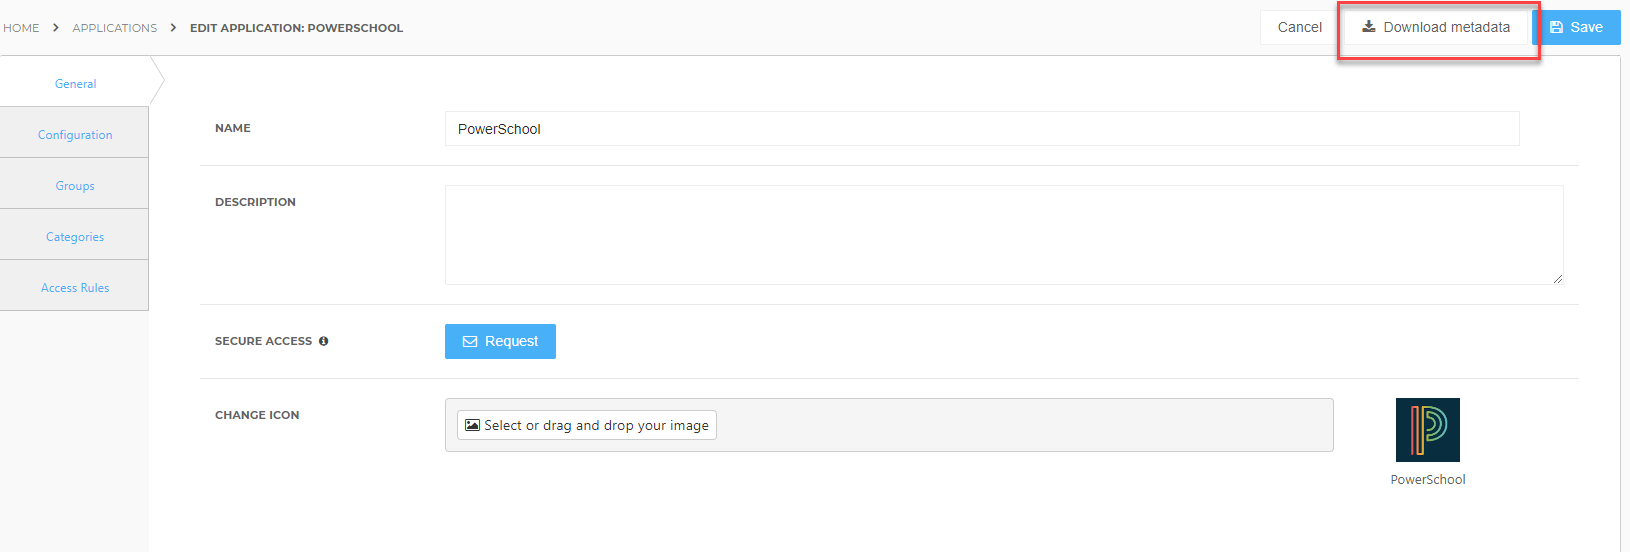
Scroll down the page an enable Hide Application. Click Save when you are finished.
Why am I hiding the application?
Some Service providers, such as PowerSchool, are host to a number of different applications or "endpoints". Instead of having users navigate directly to the PowerSchool application, you will provide users with shortcuts to its various endpoints, such as /student, /guardian, /teacher, or /admin. All of these will be routed through the PowerSchool service provider application you are now hiding.
Add PowerSchool Shortcuts
On the HelloID Administrator Dashboard, navigate to Applications > Applications. Open the Application Catalog and search for "Shortcut". Find the Generic Shortcut application and click Add.
Provide a display name for the shortcut. This should reflect the intended audience of the application, such as "PowerSchool Teachers", "PowerSchool Students", "PowerSchool Guardians" or "PowerSchool Admins".
Provide a default login URL for the shortcut. Just like the display name, this should reflect the intended audience of the application. It is this URL that will route users to their specific PowerSchool endpoint. Use one of the following options, and replace {customer url} with your own PowerSchool base URL.
Admins
https://{customer url}/admin
Guardians
https://{customer url}/guardian
Students
https://{customer url}/student
Teachers
https://{customer url}/teachers
Click Save when you are finished.
Repeat these steps for each of the shortcuts you wish to create.
PowerSchool Configuration
Configure the Plugin.xml template
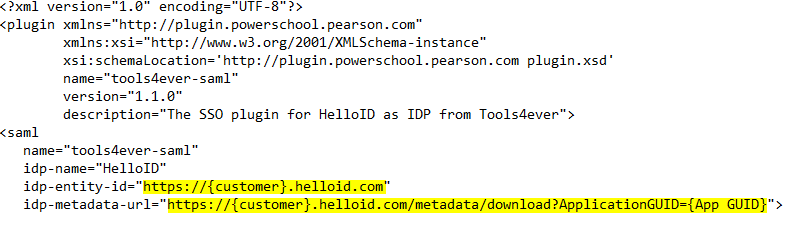
PowerSchool uses a plugin to talk to HelloID. This plugin is defined by an XML file, which you will find as an attachment to this article.
Before you upload the plugin.xml file to PowerSchool, you'll need to update some of the values inside of it to reflect your particular instance of HelloID and the application that you just created.
Download the plugin.xml file attachment found at the end of this article. Then, open it with your preferred text editor and update the following attribute values. When you are finished, save the file and move on to the next steps.
idp-entity-id: Update the value of this attribute to reflect your HelloID instance URL.
idp-metadata-url: Update the value of this attribute to the metadata URL that you copied in earlier steps.
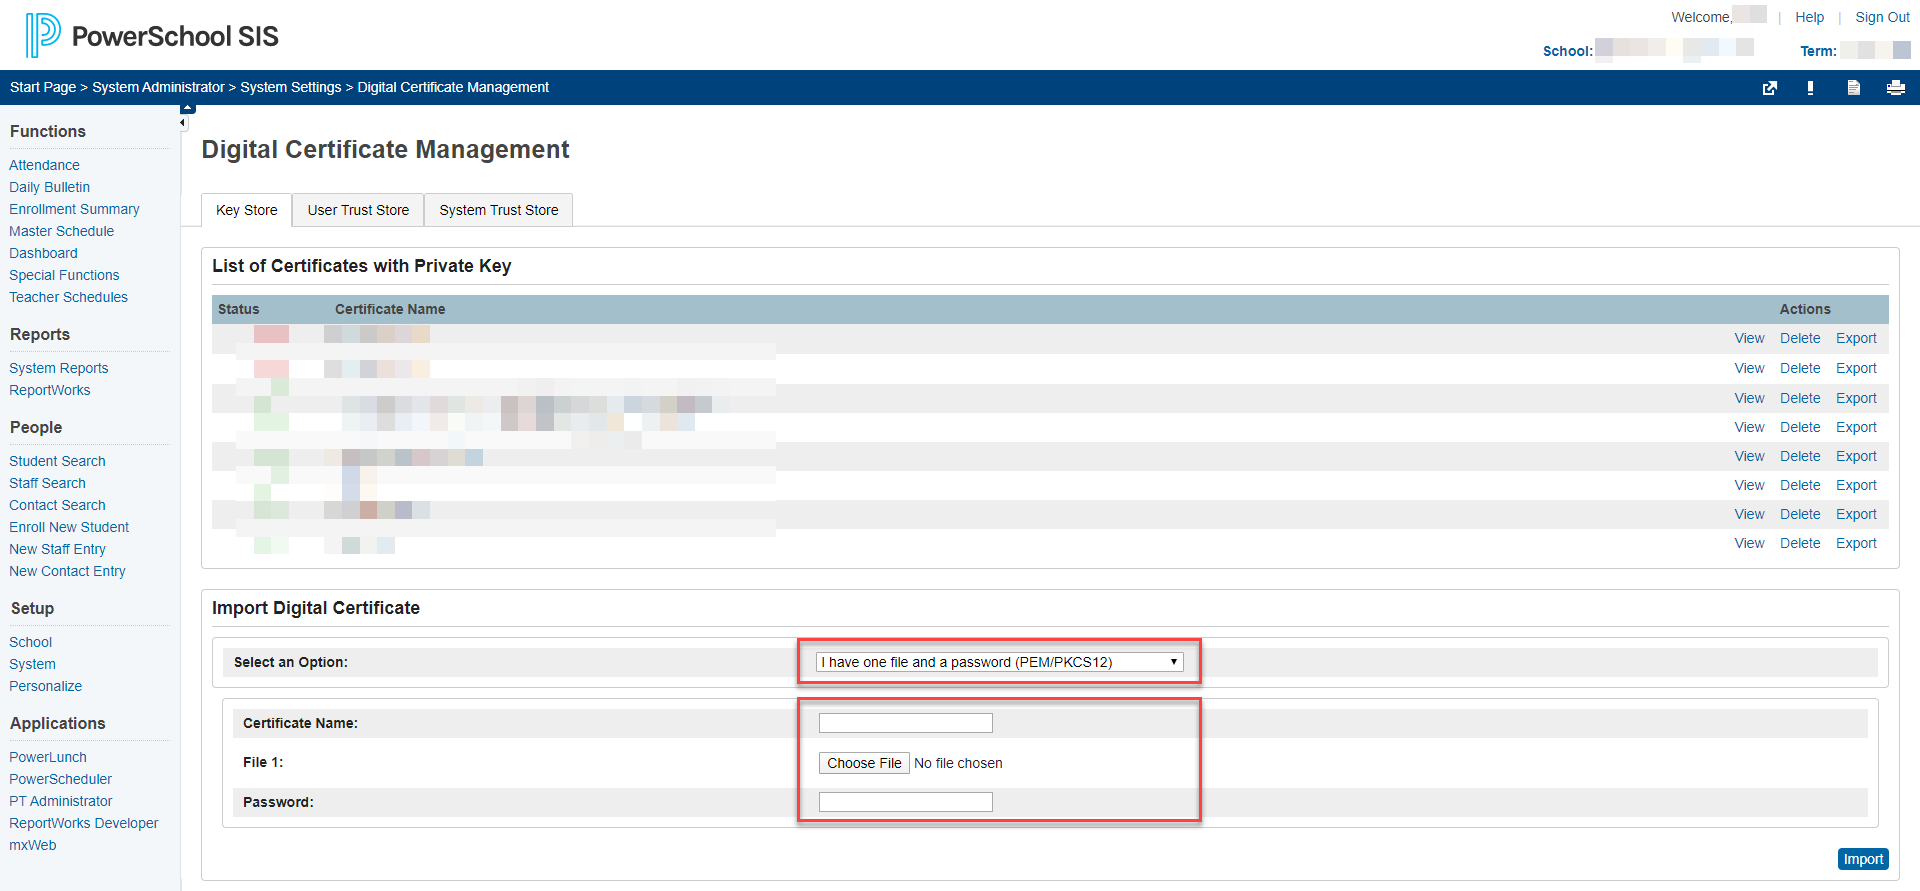
Upload the Certificate
Inside of PowerSchool, navigate to System Administrator > System Settings > Digital Certificate Management. In the Import Digital Certificate section, use the following options and then click Import.
Select an Option: I have one file and a password (PEM/PCKS12).
Certificate Name: Provide a relevant name for this certificate (e.g., HelloID SAML).
File 1: Choose the PFX file that you downloaded earlier in this guide.
Password: Provide the password that you entered while exporting the PFX file.
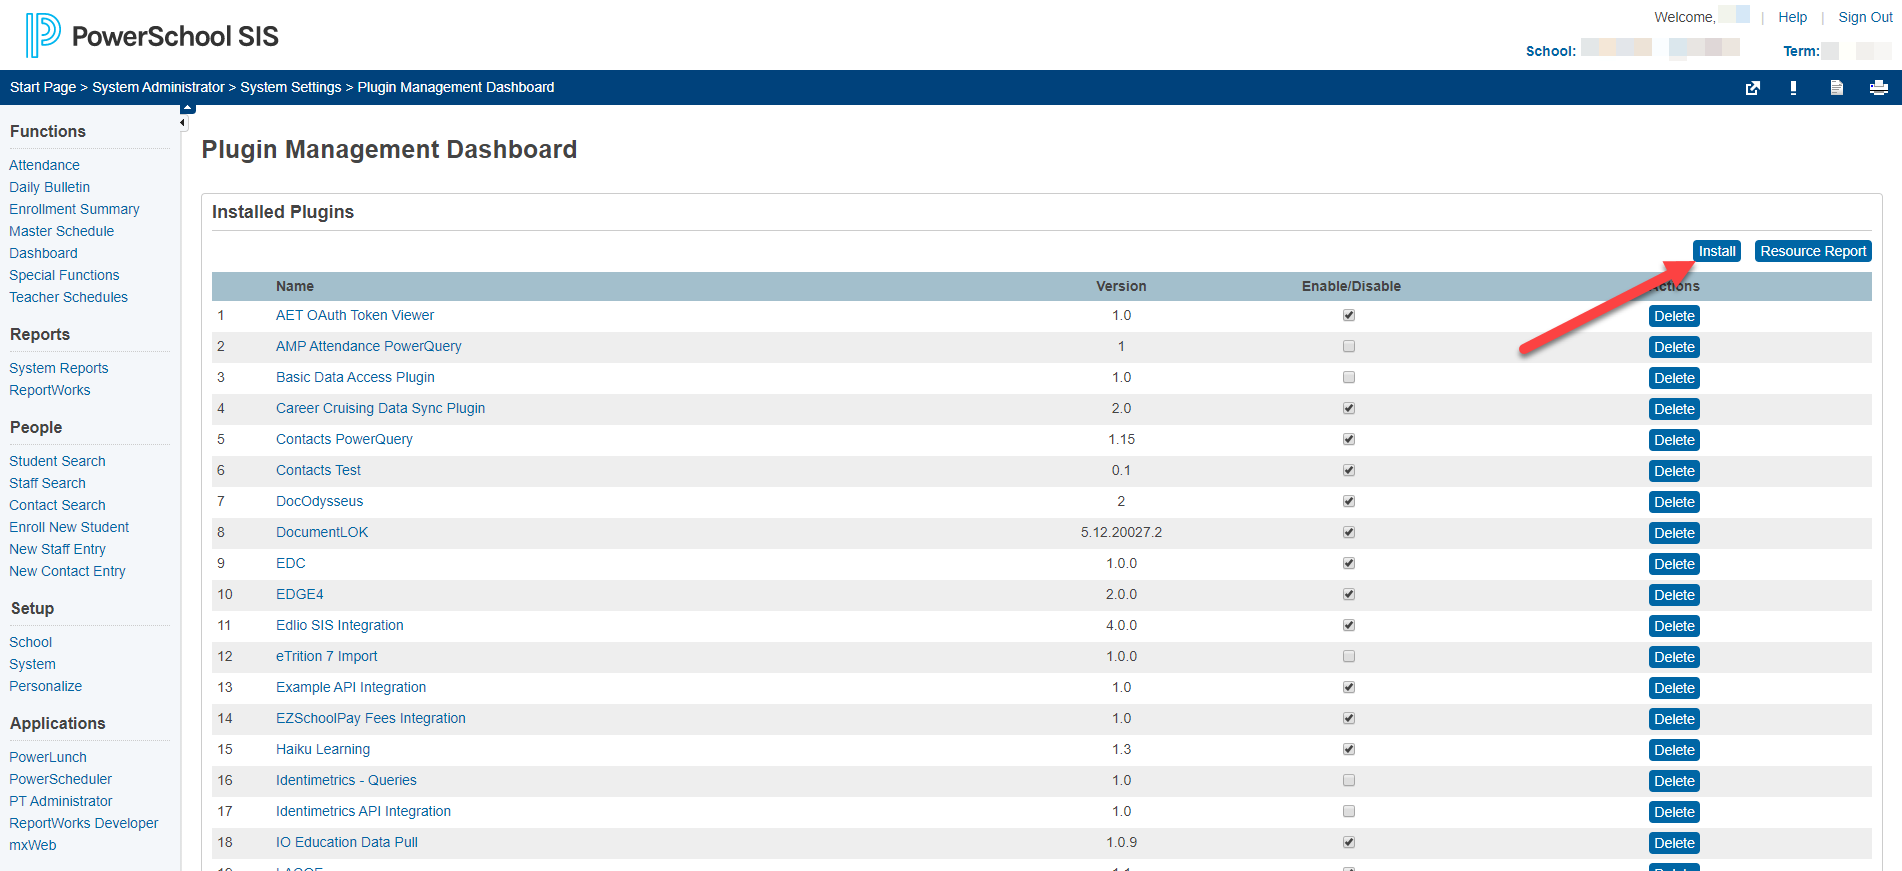
Install the Plugin.xml File
To install the plugin and finalize communications between PowerSchool and HelloID, navigate to System Administrator > System Settings > Plugin Management Dashboard. Click the Install button.
Next, click Choose File and browse to the Plugin.xml file that you downloaded and updated in previous steps. Click the Install button to upload the file to PowerSchool.
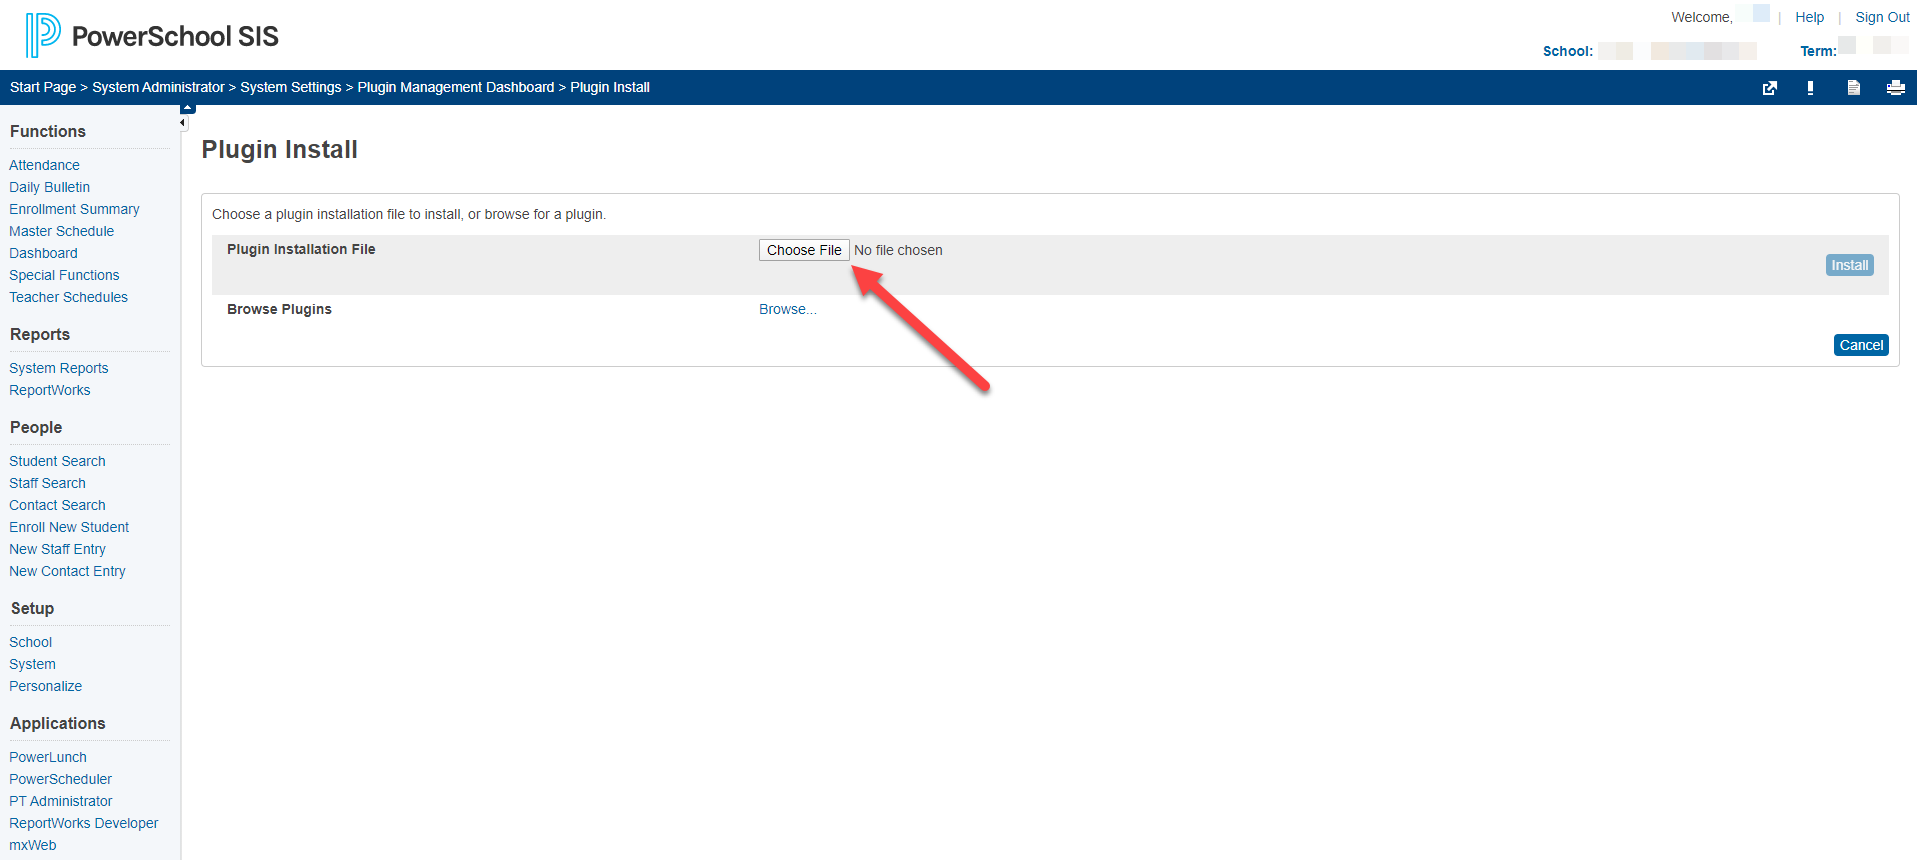
After uploading the file, restart PowerSchool to load the new settings.
Choose user types to authenticate
Finally, go to System > Security > SAML Authentication Setup. Select the check box next to each user type you wish to authenticate against the IdP. Select the Submit button.
Test the Connection
Now that you've completed the configuration of the PowerSchool SSO application in HelloID, as well as the configurations inside of PowerSchool, you're ready to test! Users who have access to any of the application shortcuts will see their icons appear on their HelloID End User Dashboard. When they click on the icon, they'll be routed to the appropriate endpoint and authenticated.