Microsoft Azure (Office365) SAML application setup
Introduction
This guide will walk you through configuring HelloID and Microsoft Azure (including Office365) for SAMLsingle sign-on.
Requirements
HelloID environment
Azure AD environment with a custom domain
The use of Azure MFA is not supported when federating the Azure AD domain.
Please disable MFA to be able to log in to Azure with HelloID.
Access to PowerShell ISE version 5.1 or later
Known limitations
The use of Azure MFA is not supported when federating the Azure AD domain.
Please disable MFA to be able to log in to Azure with HelloID.
We do not support SSO for Azure in combination with Windows Autopilot.
Outlook 2010 does not support Modern Authentication by default.
When using HelloID as IDP for Azure AD, Modern Authentication is required. Check out the following links for more information:
The default domain
*.onmicrosoft.comcannot be used for federation. To add a domain in Microsoft Azure go to Admin Center >Settings >Domains.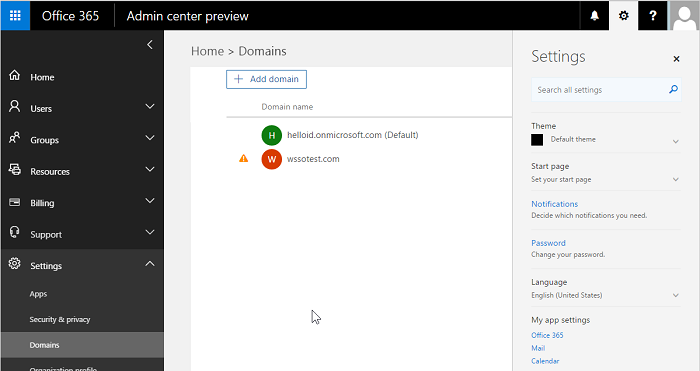
Backup Account
Before proceeding with the federation, make sure there is a backup admin account that is not a member of the domain which you want to federate. The following screenshot provides an example of these two types of accounts.
that is going to be federated.
Backupadmin: Member of the
*.onmicrosoft.comdomain, the default domain.

Create an Application for Microsoft Azure in HelloID
Add the Azure Application
If there is no certificate yet, a certificate must be imported or created. For this tutorial, we will use a self-signed certificate. Go to Settings > Certificates and press Create Self-Signed Certificate to create a Certificate for Microsoft Azure. Learn more about certificates here.
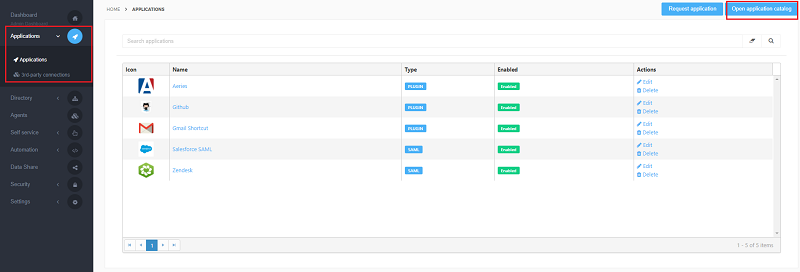
Go to Applications > Applications and press Open application catalog.
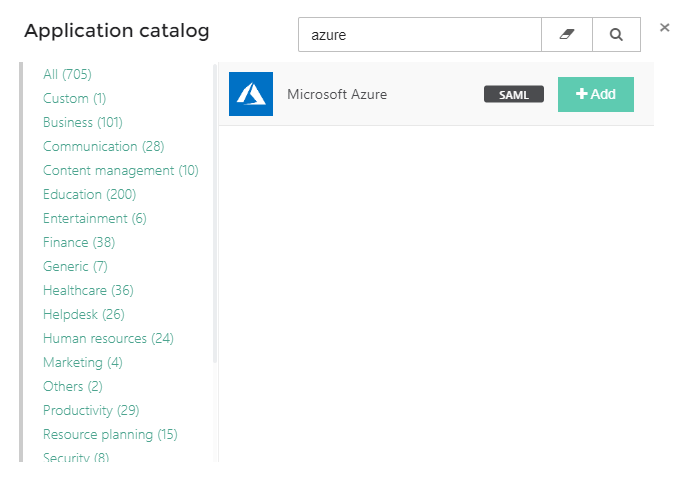
Search for the Microsoft Azure SAML application template and press Add.
General tab
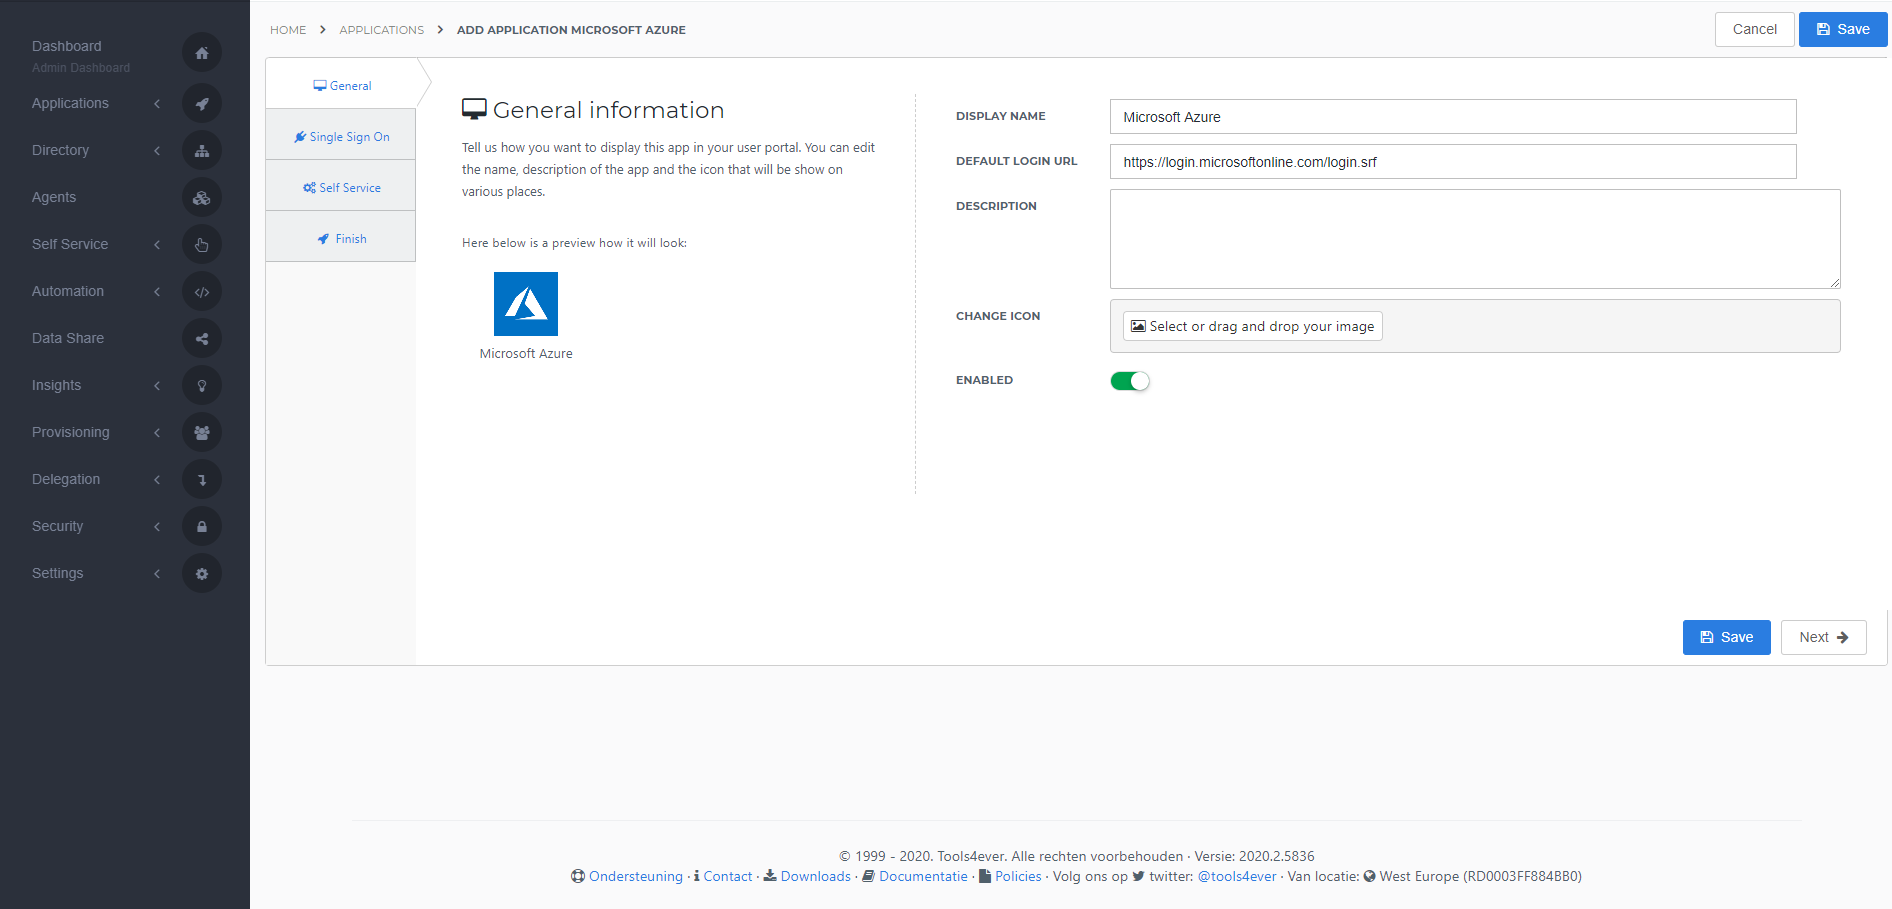
On the General tab, the Default settings do not need to be changed. Press Next to continue.
Single Sign-on tab
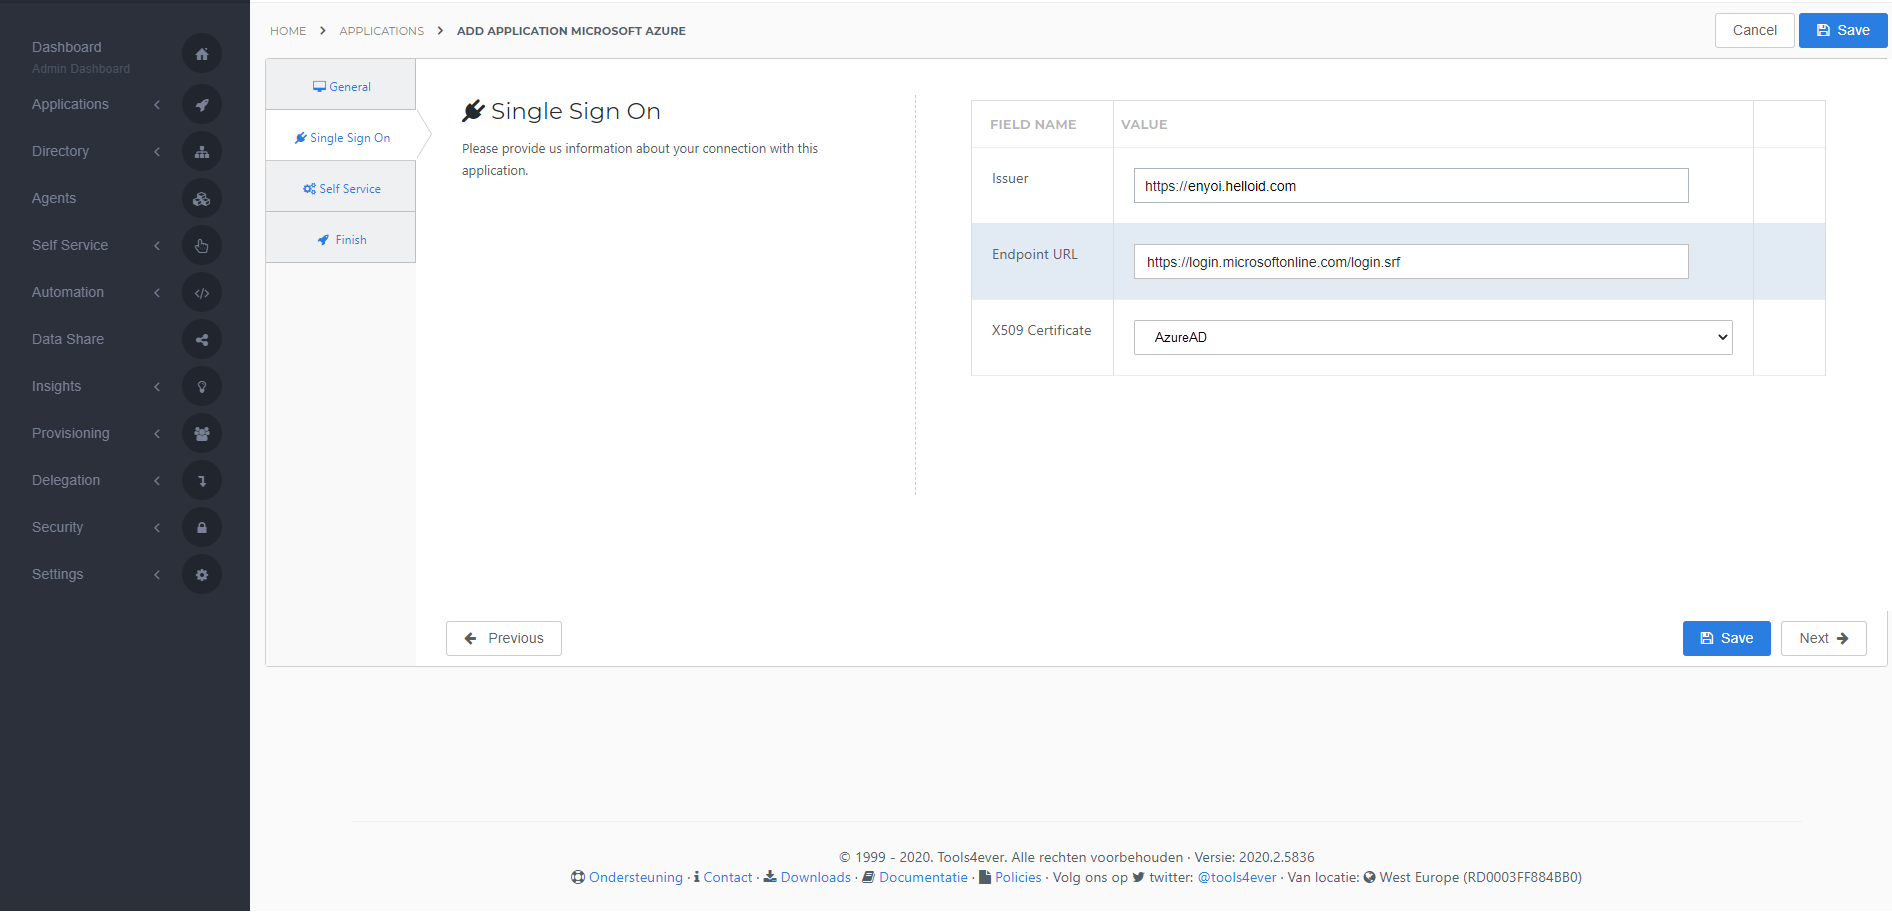
On the Single Sign-On tab, perform the following steps:
For the Issuer field, provide your HelloID domain in the format
https://{customer}.helloid.com.Endpoint/ACS URL does not need to be changed.
In the X509 Certificate dropdown, select the certificate that you created or imported previously.
Select the certificate you created at the start of this guide and press Next.
Self service tab
On the Self Service tab, choose whether to automatically create a Self Service product, which makes the application requestable. This is optional. Click Next.
Finish tab
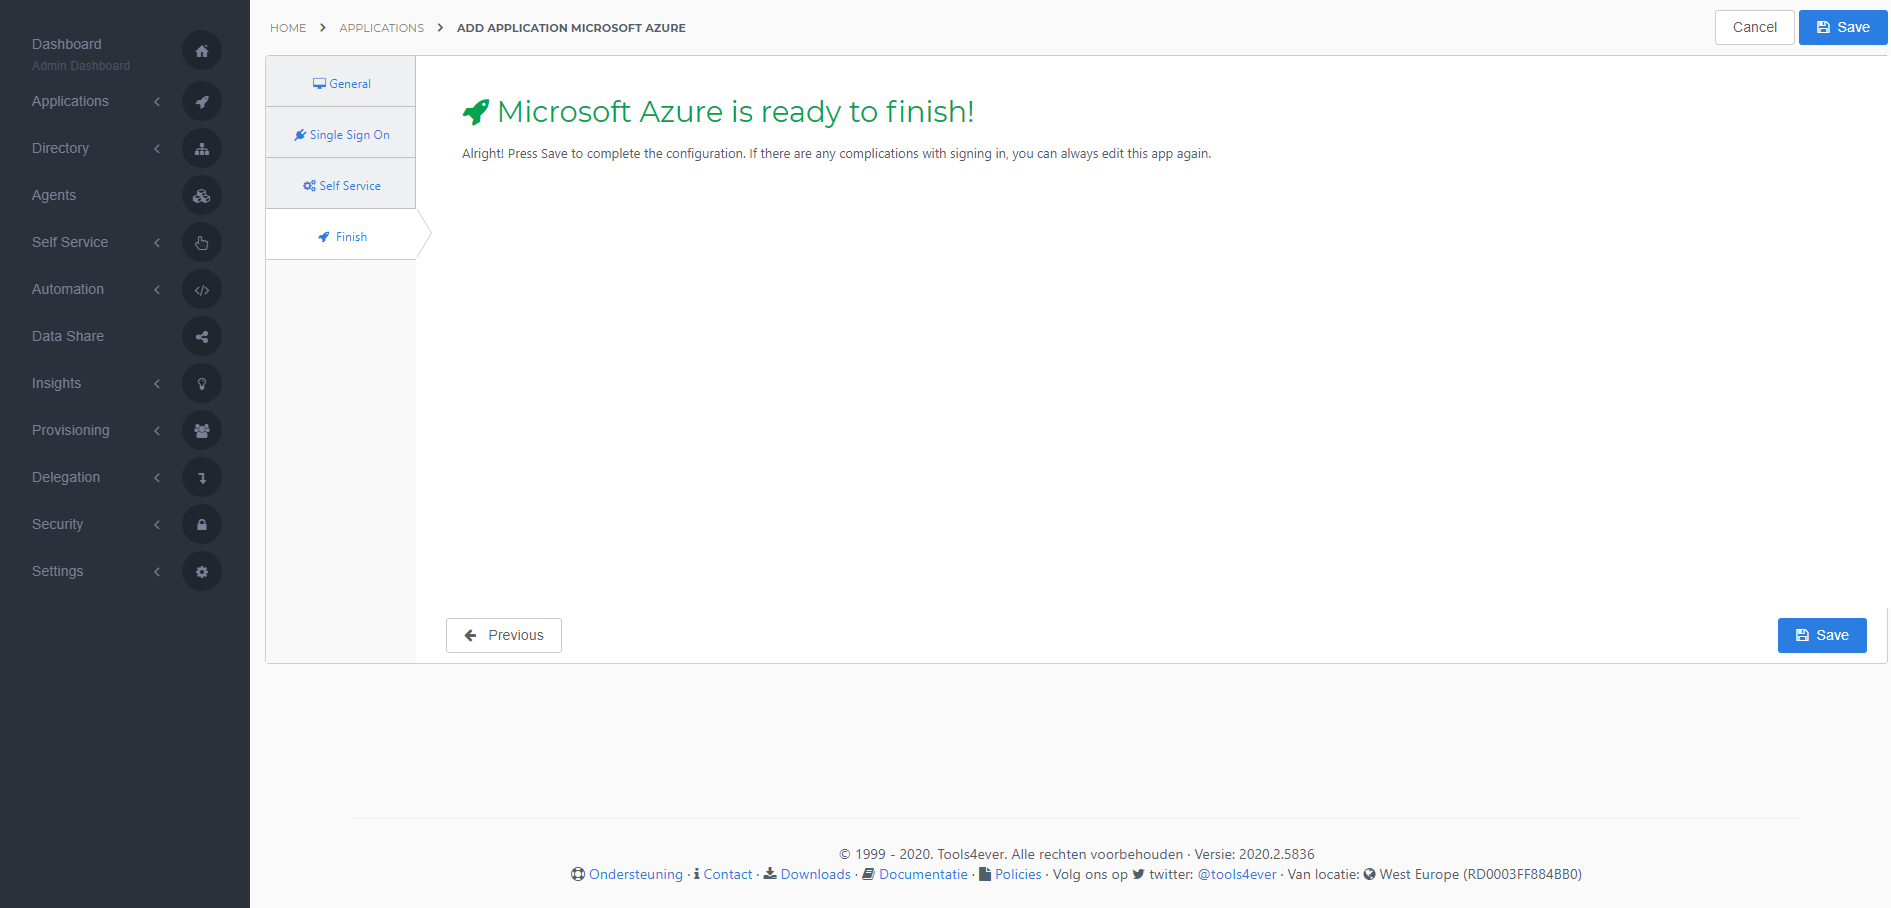
On the Finish tab, click Save to add the application to HelloID.
Configuring the application's mapping set
By default, the NameID attribute in the Azure AD application's mapping set is mapped from the user's HelloID username ({{user.userName}}). However, as per the Azure AD documentation, the NameID assertion must match the Azure AD user's ImmutableID. Most commonly, Azure AD users are synced from an on-premises AD environment via the Azure AD Connect tool, in which case the default setting for the Azure AD ImmutableID is the base64 encoded string of the on-premises AD account's ObjectGUID. If your environment is configured this way (and your on-premises AD is being synced to HelloID via the HelloID Agent), you'll need to create a new attribute in your on-premises AD's mapping set to calculate this value. This will let you send it as the Azure AD NameID.
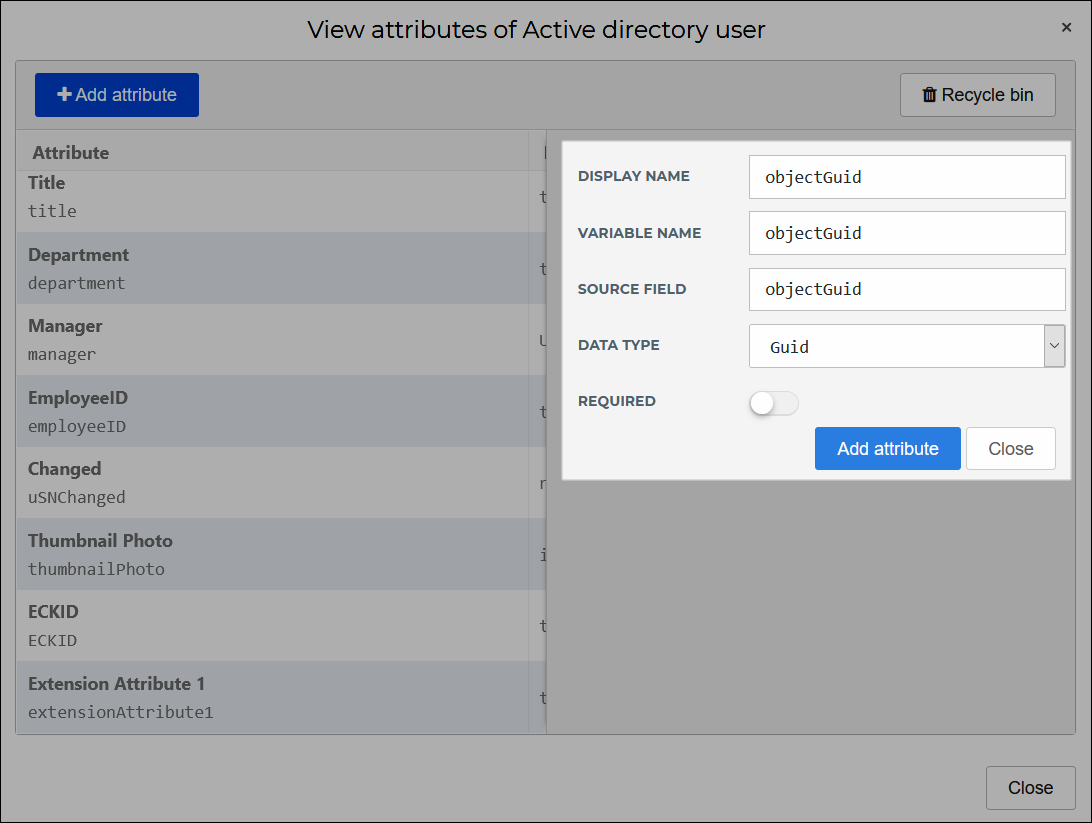
To do so, go to Directory > Mapping Sets and add the following attribute to your on-premises AD's mapping set. Learn how to add an attribute here.
Display Name
objectGuidVariable Name
objectGuidSource Field
objectGuidData Type
GuidRequired
No
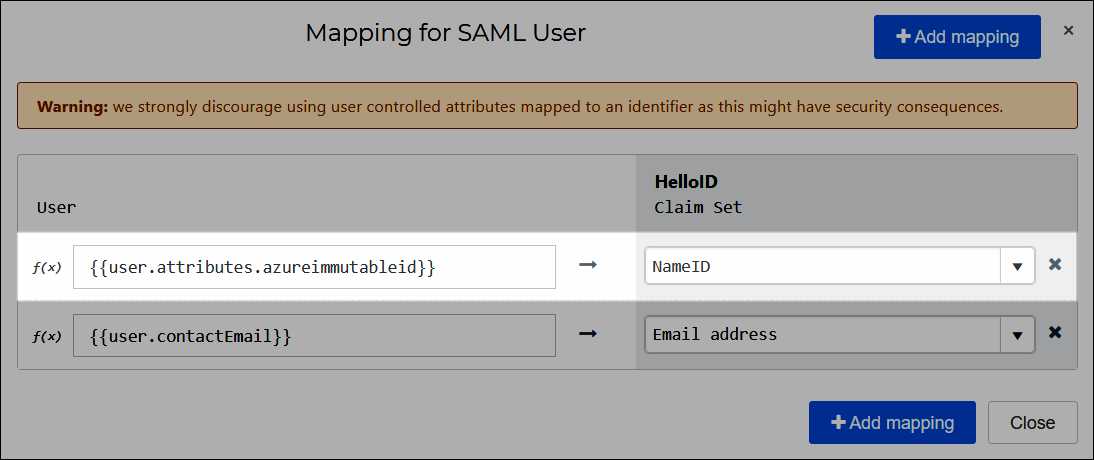
Then, map this new attribute as follows:
IdP user attribute
{{user.objectGuid}}(select the f(x) link, and then select Encode to Base64 in the drop down)HelloID user attribute
user.attributes.azureimmutableid

The next time your IdP is synchronized, the azureimmutableid user attribute will be added to the HelloID user schema, and populated with the calculated value:

Now you can pass this value to the Azure AD NameID in the Azure AD mapping set:
HelloID user attribute
{{user.attributes.azureimmutableid}}Azure AD assertion
NameID
Application metadata
After saving the Azure application, click its Edit link on the applications overview. This will bring you to its properties page.
Metadata (URL)
Right click the Download metadata button and copy the link address (e.g., https://enyoi.helloid.com/metadata/download?ApplicationGUID=e6e741f5-a469-4849-93f7-fe2e259a339f).
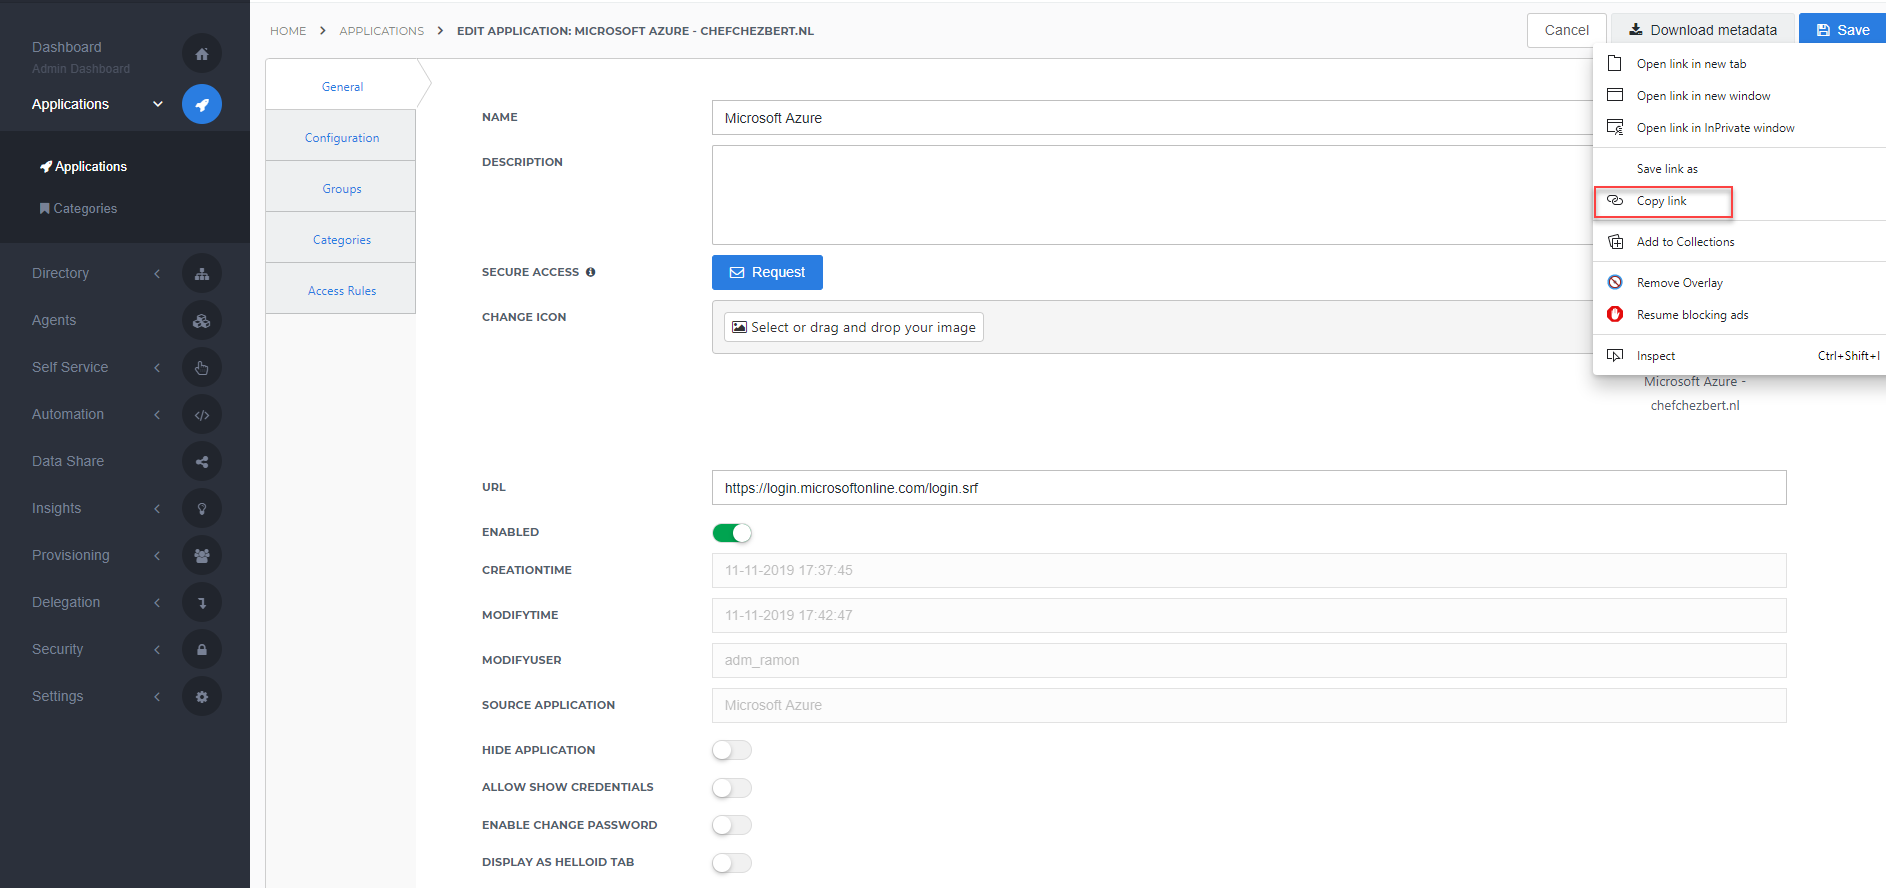
Federate Microsoft Azure with HelloID
Open PowerShell ISE as Administrator.
Copy the following script and fill in the following parameters:
$domain
Replace
<custom_azure_domain>with your custom Azure domain.$metadataUri
Replace
<HelloID_application_metadata_uri>with the HelloID application metadata URI.# Define domain name to use HelloID as IDP for. $domain = "<custom_azure_domain>" # Define HelloID metadata download URI $metadataUri = "<HelloID_application_metadata_uri>" ###------------------------------ This script will set HelloID as IDP for an Office365 domain ------------------------------### function Set-AzureADIdpFederation { [CmdletBinding()] param( [Parameter(Mandatory = $true, HelpMessage = "Please enter the Office 365 domain you wish to federate. Example: Enyoi.com", ValueFromPipeline = $true, ValueFromPipelineByPropertyName = $true)] [ValidateNotNullOrEmpty()] [String] $Domain, [Parameter(Mandatory = $true, HelpMessage = "Please enter the HelloID metadata download URL. Example: https://enyoi.helloid.com/metadata/download?ApplicationGUID=3un12a05-92p3-3210-99fe-3c2tgmd8373f", ValueFromPipeline = $true, ValueFromPipelineByPropertyName = $true, ParameterSetName = "ParseMetadataFile")] [ValidateNotNullOrEmpty()] [String] $MetadataUri ) # Install MSOnline PowerShell module, if not already available. if (!(Get-Module -ListAvailable -Name MsOnline)) { Install-Module MsOnline } # Import MSOnline PowerShell module, if not already imported. if (!(Get-Module -Name MsOnline)) { Import-Module MsOnline } # Connect to Office365 #Connect-MsolService # Get all Office365 domains, provides a list you can choose from $o365Domains = get-msoldomain # If the domain is already federated, it has to be reverted. $selectedDomain = $o365Domains | Where-Object { $_.Name -eq $Domain } if ($selectedDomain.Authentication -eq "Federated") { #Set-MSOLDomainAuthentication -Authentication Managed -DomainName $Domain } # Parse Metadata and get required info $metadata = Invoke-RestMethod -Method Get -Uri $metadataUri $issuerUri = $metadata.EntityDescriptor.entityID foreach ($binding in $metadata.EntityDescriptor.IDPSSODescriptor.SingleSignOnService) { if ($binding.Binding -eq "urn:oasis:names:tc:SAML:2.0:bindings:HTTP-POST" ) { # Not sure if the activeLoginUri is correct like this. $activeLogOnUri = $binding.Location $passiveLogOnUri = $binding.Location } } $logOffUri = ([regex]::split($passiveLogOnUri, '(https:\/\/.*\.helloid\.com)')[1]) + "/Authentication/Signoff" $signingCertificate = $metadata.EntityDescriptor.IDPSSODescriptor.KeyDescriptor.KeyInfo.X509Data.X509Certificate $federationParameters = @{ DomainName = $Domain FederationBrandName = $Domain Authentication = "Federated" ActiveLogOnUri = $activeLogOnUri PassiveLogOnUri = $passiveLogOnUri IssuerUri = $issuerUri LogOffUri = $logOffUri SigningCertificate = $signingCertificate PreferredAuthenticationProtocol = "SAMLP" SupportsMfa = $true MetadataExchangeUri = $metadataUri } Set-MsolDomainAuthentication @federationParameters # Get an overview of the configured settings Get-MsolDomainFederationSettings -DomainName $Domain } # Set the newly configured HelloID application as the IDP for the Office365 domain Set-AzureADIdpFederation -Domain $domain -MetadataUri $metadataUriExecute the script.
A dialog box will ask for the credentials. Enter the credentials of the backup admin account and select the OK button. (The credentials are now available by using the variable
$credentials)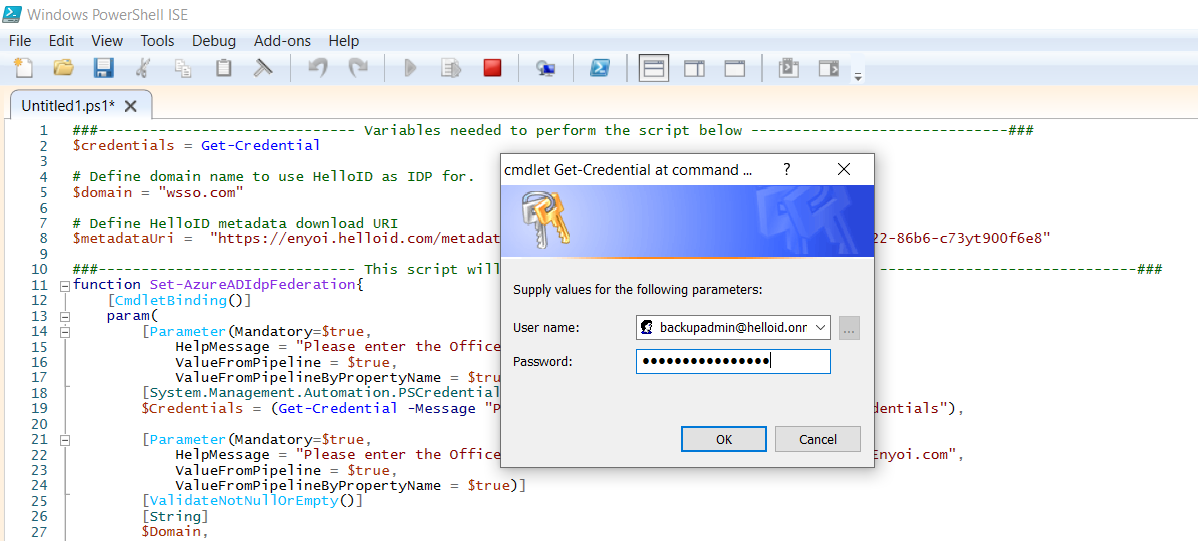
Go to: https://login.microsoftonline.com and enter a user in the federated domain. The authentication request will be routed to HelloID.
The user will be logged in to Microsoft Azure portal.
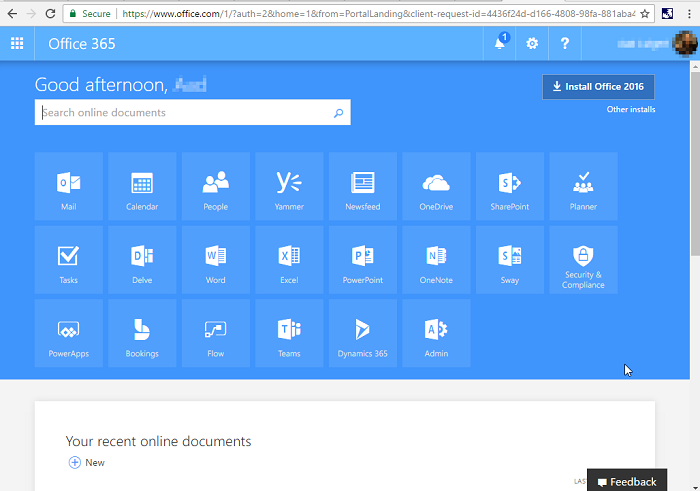
If users keep getting asked to 'remember this logon' you can disable this option in the Company branding screen. Change the option Show option to remain signed in to No.
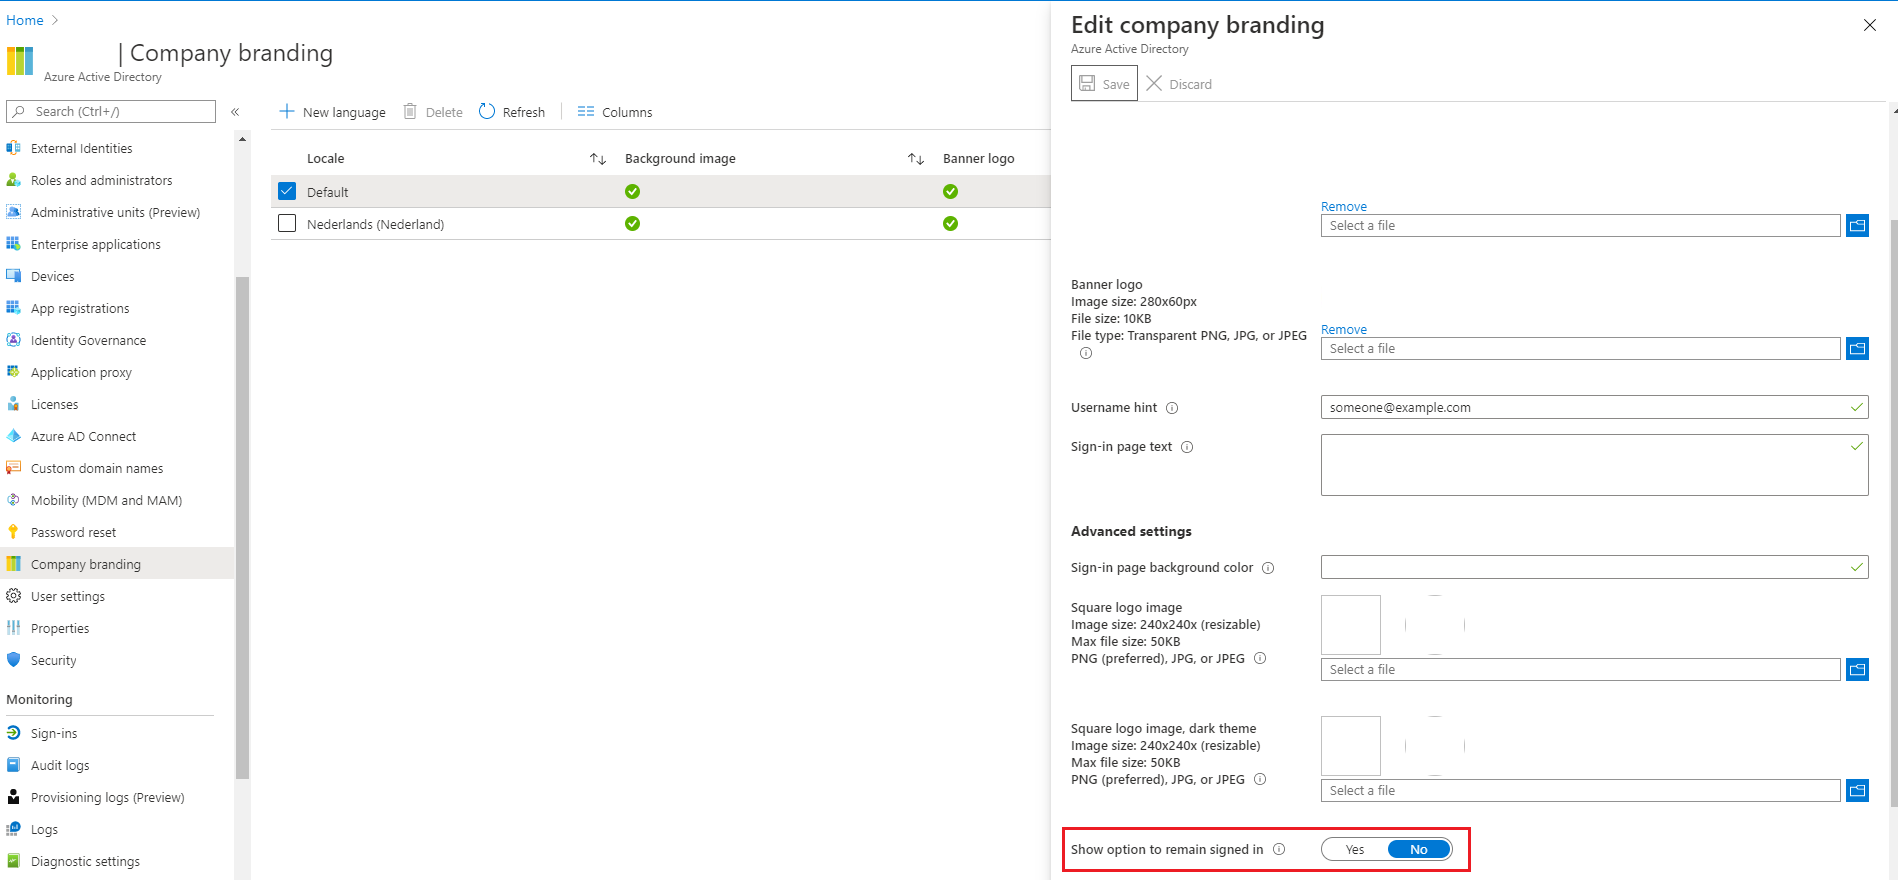
Configuration is now complete. If the signing certificate expires, follow the instructions below to update it.
Update expired certificate
Follow these instructions to update an expired signing certificate.
Delete the existing certificate in HelloID. See Delete a Certificate.
Create a new self-signed certificate. See Create a New Self-Signed Certificate.
Open PowerShell ISE as Administrator.
Customize and run the following PowerShell code:
$domain
Replace
domainname.comwith your custom Azure domain.$metadataUri
Replace
domainname.comwith your custom Azure domain.# Define domain name to use HelloID as IDP for. $domain = "domainname.com" # Define HelloID metadata download URI $metadataUri = "https://domainname.com/metadata/download?ApplicationGUID=fcd451c3-1234-4ce0-1234-37f07cb797c5" # Parse Metadata and get required info $metadata = Invoke-RestMethod -Method Get -Uri $metadataUri $signingCertificate = $metadata.EntityDescriptor.IDPSSODescriptor.KeyDescriptor.KeyInfo.X509Data.X509Certificate # Execute actions Set-MsolDomainFederationSettings -PreferredAuthenticationProtocol "samlp" -DomainName "$domain" -SigningCertificate "$signingCertificate" Get-MsolDomainFederationSettings -DomainName $domain